Camtasia 2019 Review: What Can You Really Do With This Video Editing Software?
So you’re wondering what software is all about, or you already know but want to learn more and see, if it’s right for you?

For those who don’t know, Camtasia is a simplified video editing and screen recorder software developed by TechSmith. They have other products like Snagit, Screencast and more. I always see other YouTubers, and even businessperson using it for their video content.I’ll share my own experience that I have been using it for years now.
Camtasia is perfect for beginners who want to edit their videos for the first time. It comes with Screen recorder and easy “drag and drop” effects, which I’ll touch on more later in this review.

TechSmith also offers tutorials on how to use Camtasia, which was really helpful for me when I first started it. You can also find some great tutorials on Youtube, that you can check out as well if you do get stuck.
I’ll break down into parts…
Drag and drop and overall interface

This is my favorite part when it comes to video editing programs where you can drag and drop images on to video canvas. But first, you’ll need to import media into media bin in order to be able to drag and drop media into the canvas. You can play around with positioning, changing sizes, opacity, and rotation. On top of the video canva there are 3 tools:

Edit mode – It allows you to move, resize and rotate media on the canvas.

Pan mode – Icon looks like the shape of a hand, you can also press hold spacebar command. It’s used to drag canvas around for a better view. The media retains original position and size when panning. Canvas editing is disabled in a pan mode.

Crop mode – You can also press hold alt. It can be used to trim unwanted areas from media.
Screen Recorder

This software comes with a screen recorder like I briefly mentioned before. What does it do?
It can record anything on your computer screen, except it cannot record in full-screen mode if you want to record you playing video games for an example. Even if you try, it will always record the black screen no matter what you do. Sadly I couldn’t make it work. And the frames also drops a lot, if you play any 3D video games. So it is quite a downside for a screen recorder for me personally. If you’re looking to record game footage, well then you’re out of luck.
But there are other screen recording software programs like OBS (Open Broadcaster Software) who does a better job in my opinion. I highly recommend getting OBS. It’s also free software to download. Pretty cool, huh? You can get it here. With that, you can record videos on OBS and use those recorded clips to edit in Camtasia editor. Hopefully in future updates, they might improve on that.
Don’t get me wrong, it is a fine recorder. The quality is sharp and crisp if you want to record something simple or record none full-screen games. However, you can still record your desktop, websites, calls, and anything you want as I have said. The cool part about when it comes to recording your face and screen at the same time, it records separately.
In the editor, you can easily move the recorded face in any position or even change the size. It will not affect the recorded screen. With a screen recorder, you can record a full screen on desktop or you can record a specific part instead. But even if you record the entire screen you can easily crop unwanted parts in an editor.
Library

The library is where you store media and assets to use in any Camtasia project. So, it also comes with few professional already made assets by TechSmith that are free to use. Those include royalty-free stock images, effect, sounds, music, and plenty more. It’s pretty neat I have to say. They offer around 900,000 assets for you to use, but you’ll have to pay a yearly fee to gain access to all of their content. You can see here.
Annotations
Ok, this is where you add text, arrows, shapes, and highlights to enhance your video and more. Simply you drag and drop into canvas or in the timeline. So, let’s look at each panel.
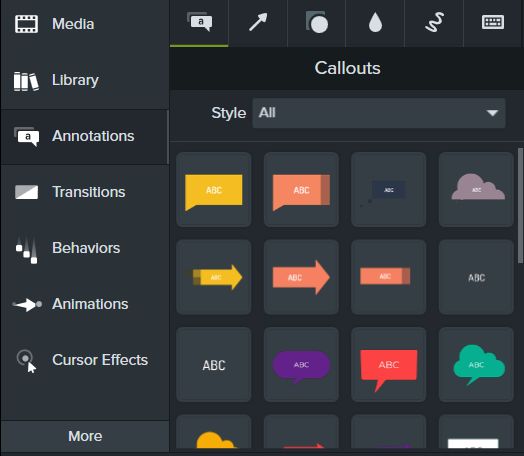
Callouts
These include text bubbles, text speech, arrows with the text and simple plain text. So I really like this one where you can add easily add text and write on it, by double-clicking the mouse. Also, the other side of the bar appears where you can change the color, font type, font style, size, and alignment.
Callout styles include: Abstract, basic, bold, urban, all, and legacy.

Arrows & Lines
These are where you add arrows. With that, you can easily change the direction where you want to point it out. On the other side of the menu in the properties panel. In that panel, this is where you can change line styles which include double arrows, dashed, or solid lines and more. So, you can also change the colors, thickness, and opacity.
Arrows & Lines styles include: Abstract, basic, bold, urban, all, and legacy.

Shapes
This is where you can add and play around with the shapes. By doing that you can do grouping, or cropping to create a new look. Also you can do some simple animation with shapes or can even be used for decorating your background with the shape tools. Pretty cool stuff you can do with this tool.
In properties panel you can change the shape, fill (Solid, Gradient), color of the shape, opacity, and below is for the outline.
Shape styles include: Abstract, basic, bold, urban and all.

Blur & Highlight
This panel includes blur, pixelate, highlight, and interactive hotspot. But the effects can be inverted in a properties panel tool.

Blur & Highlight
These are animated presets that draw on screen over a period of time. Thankfully, you don’t need to worry about the quality loss when changing the size. Since they are already made within Camtasia. In that way, it gives a nice touch for your video to look more professional. You can change the color, thickness, draw time duration, flip the side. Very useful for sure!
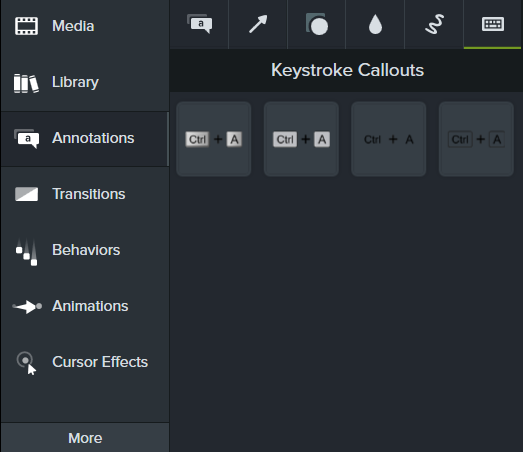
Keystroke Callouts
This tool can be used to show onscreen keyboard activity. Automatically create callouts from a Camtasia recording or you can make it your own.
Transitions
Just like in every editing software program comes transition effects. So, of course, we should not forget about it. For those who don’t know, with the transition, this is where one media transitions to different media with some nice smooth animation flow sequence. And because of that, you can create a really effective video with this tool.
You can add transitions at the beginning, end, or between media. With that said, there are fairly over 31 transitions in total and these include: fades, movement, objects, stylized and wipes.
Behaviors
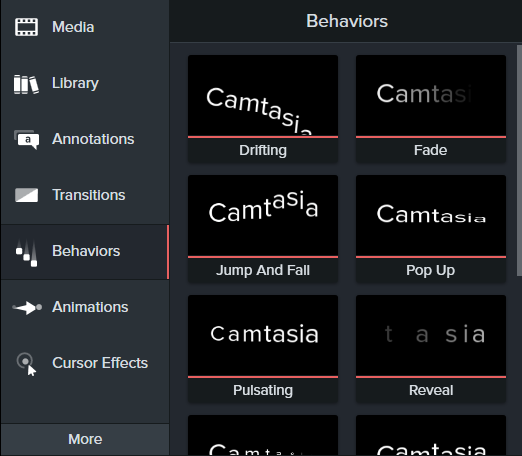
Ok, this tool is absolutely amazing and of course one of my favorite. It makes wonders for your videos. These animated effect presets can be used for both text and media. To add them, you simply drag and drop either on the timeline or on canvas.
Types of behaviors include:
- Drifting
- Explode
- Fade
- Fly-in
- Jump and fall
- Pop up
- Pulsating
- Reveal
- Scale
- Shifting
- Sliding
Again, in the properties panel for behaviors you can change:
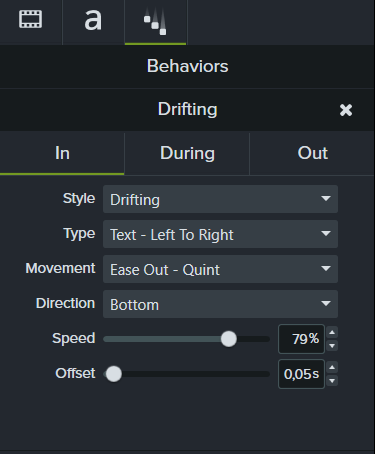
- Style
- Type – This option is useful for text format only.
- Movement
- Direction – It will only appear on a few selected behaviors.
- Speed
- Offset – Only text.
On top is where the behavior will react to the timeline:
“In” – (at the be beginning clip),
“During” – (during the timeline all the way through),
“Out” – (at the end of the clip).
But if you don’t want all the behavior duration parts to do random jiggling animation all the way through. On the panel, simply click on “Style” and then choose “None”.
Animations

As the tool says itself, this is where you can add motion effects to change the position, rotate, scale, or do more amazing things with it. However, animations may share few similarities with behavior tools and one another.
But the best part of all is that you can apply both behaviors and animations in the same media or in the same clip. This really gives a huge advantage to the flexibility to do outstanding motion animation. Because behaviors and animations are the best compliments to each other. All you need is to have an imaginative mind what you want to create with. I think you will love it.
Captions

This tool is where you add captions to your video. So what this tool is used for? As a way of adding text to transcribe each word that is said in the video. Just like what you usually see those subtitles in the movies and shows. For example, captions can be used when translating into a different language.
Cursor Effects

A cursor effect is a tool that will enable the effects when you want to point out a specific object with the cursor. To apply those effects, you can only do that during the recording process. With that said you can use the highlight, spotlight, and magnify. Also, you can add click sounds and effects as well.
Voice Narration

Here you can record your voice while timeline plays at the same time. The text bar is for you to paste the text or scripts to help you read aloud for easy narration. Well, you can also record your voice with a screen recorder too as another way.
Audio Effects
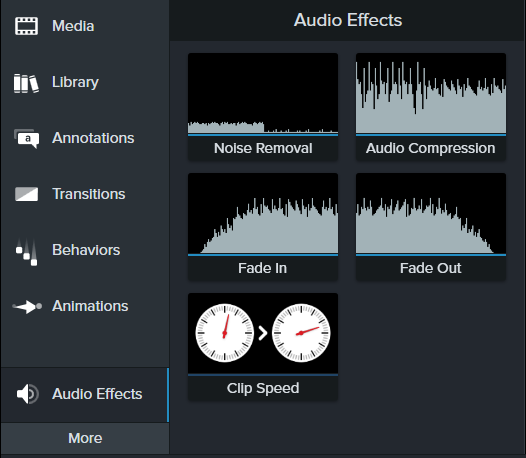
This is a pretty useful tool. Where you enhance and improve audio quality. You can add volume leveling, fade in, fade out, use the clip to change the speed, and even remove the background noize.
Visual Effects
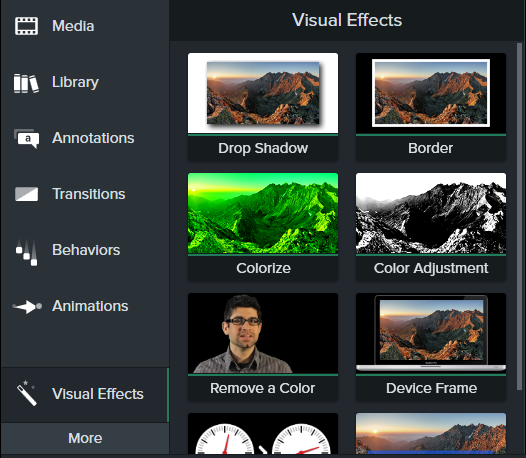
In visual effects, you can apply effects like drop shadow, border, green screen removal, colorize, color adjustment, clip speed, device or interactive hotspot. Kinda wish there were more visual effects that Camtasia can have. Hopefully or maybe in the future, they could add it more.
Interactivity
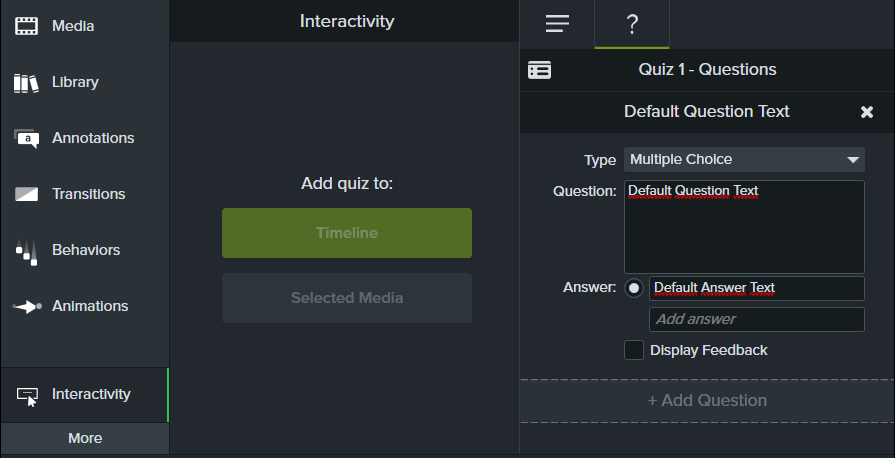
This is where you can add quizzes or some type of survey if you want. Well, this only works when you produce using Screencast.com or a Smart Player preset. Not something I would really find any use of it. Maybe you might find it useful if this is something you’re looking for. So there you go!

When you’re done with the video and it’s time to render it. You can head on to the right top of the icon button where it says “share”. When you click on it, the menu pops out with options where you can choose to share the video. I always save videos in my “Local File” to my PC, just to make sure if the video rendered properly or made any mistakes.
Do I need a very powerful PC to be able to run Camtasia?
Glad you’re asking! Thankfully PC can handle Camtasia quite well. When comparing Camtasia to other professional video editing programs like Adobe Premiere, or a video composition like Adobe After Effects, or any other professional video editing software. Unlike Camtasia, they require way more RAM memory in order to run a program smoothly. So Camtasia is definitely a winner here.
With 8GB RAM memory you’re good to go and Camtasia can work below that. As long as you don’t apply too many heavy effects, you’ll be fine. Or when you apply behavior effects on the text too. Yes, you may experience slow down slightly a bit, not in all parts, but it’s not as bad, unlike with other professional programs that I mentioned.
30-Day free trial
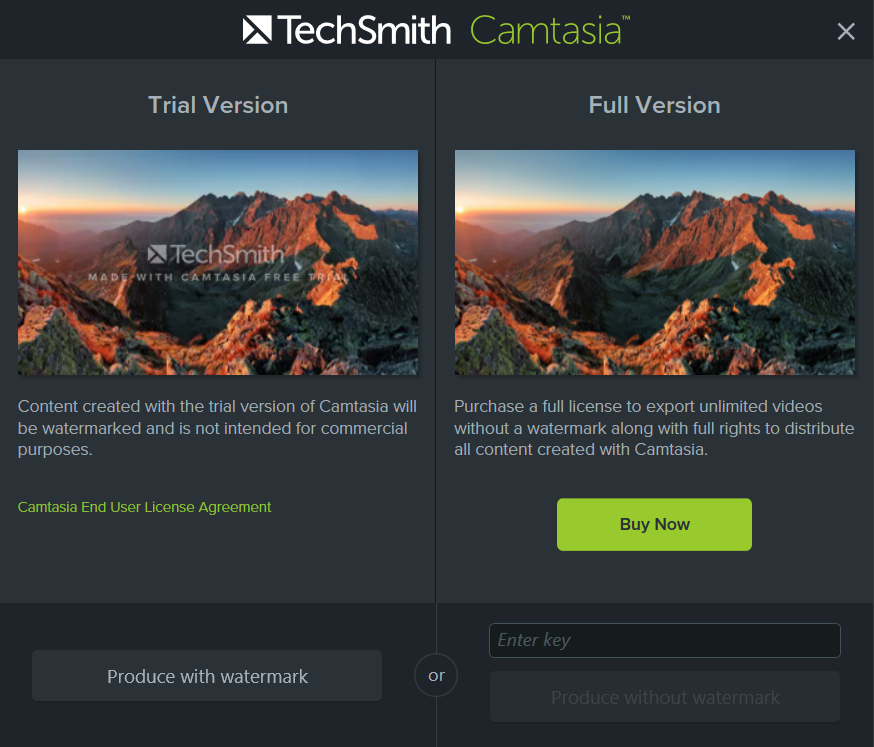
Camtasia offers a 30-day free trial for you to try out and play around with the tools. You can find out, if this software suits your needs or not. So there’s nothing for you to lose if you try. But if you’re using a trial version, there’s one thing you need to keep an eye on. For instance, if you decide that you want to render the finalized video, well your video will have a watermark with Camtasia logo in it. In order to remove it, you’re gonna have to buy the licensed software in that case.
Pros about Camtasia
● Very beginner-friendly.
● The GIF format is included in Camtasia. Very useful to me and convenient.
● The software handles quite PC fine, without too much lagging. Works fine on 8 RAM memory and below. Which is really good for a video editing program.
● It offers very decent tools needed to make a good looking professional video that gets it done.
● You can actually create a cool simple motion video with Camtasia.
● Camtasia allows rendering high-quality videos, with no pixelation, blur, or any type of disruption.
● It’s not a monthly subscription. Once you bought the software you keep it forever. However, they do charge for the upgrade fees every year when they release a new version with new features, tools, and fixes.
Cons
● Sometimes Camtasia can crash randomly for some reason, even when you don’t do much heavy editing. I suggest you save more frequently just in case if the crash does happen.
● The screen recorder is not the best. Not very ideal for recording video gameplay, unfortunately. OBS (Open Broadcaster Software) will do a better job as a screen recorder.
● I feel like there are too few visual effects to use in my opinion, it would have been cool if they added a bit more in the future updates.
● Even though you can make a nice motion animation with Camtasia. However, you won’t be able to work on more complex animation and it has some limitations. This is not After Effects, after all, you know? But you can still use both of them and create an amazing video if that’s what you want. So why not use both of them?
● Since Camtasia is a professional video editing software, so of course it’s a bit more pricey for many people. But again since this is not a monthly subscription, once you buy it you keep it forever.
Final thoughts
Overall Camtasia is really great video editor software. Actually one of my favorites so far and I enjoy using it whenever I need. It gets its job done. Camtasia is very easy to use and it was perfectly designed for beginners. It offers enough tools for you to create a professional-looking video. Personally I would recommend using Camtasia, so it gets thumbs up for me.
I think that’s all for now! Thank you for reading!